Tools Menu
Manage Features/Attribs etc.
To setup or edit a database design select the Manage
Features/Attribs etc option from the Tools Menu.
Use the vertical and horizontal tabs on the displayed form to manage/edit
the following items:
Feature Types
Click on the Feature Types tab to setup and
edit the feature types in the currently opened STEMgis database.
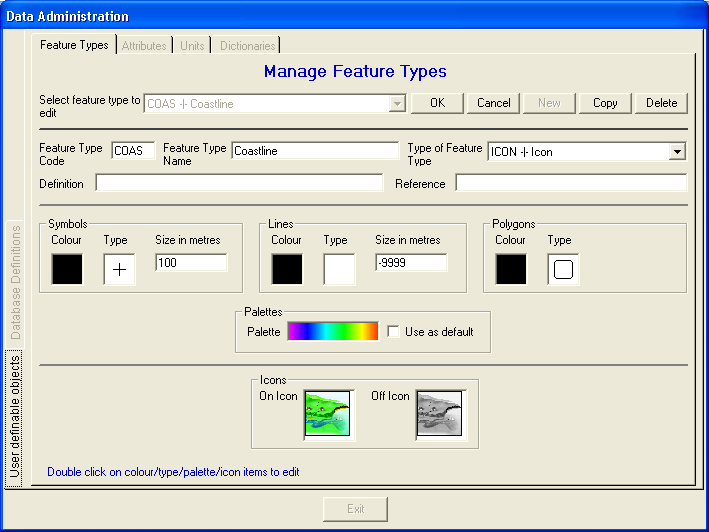
To edit an existing feature type select a feature type from the drop-down list
or to add a new feature type click on the New
button. You can then enter or modify any of the items which are used to define
a feature type. If a new feature type is being added then a Feature
Type Code and a Feature Type Name must
be entered. All other items (except those designated as optional) will take
default values unless you enter or change the values. The items that may be
entered or modified are:
- Feature Type Code -
a unique four character text string used to identify the Feature Type both
internally within the database and within any input files that are being loaded
into the database.
- Feature Type Name - a textual description
of the Feature Type which is displayed in the Query
Wizard in the STEMgis Viewer -
can be up to 255 characters but is best kept below 50 for visualization in
the Query Wizard.
- Type of Feature Type - used to define how
the Feature Type should be explored and visualized. Options.
- Definition - a longer text description of
the Feature Type
- Reference - used to define a reference to
the Feature Type (optional)
- Symbols (Colour) - defines a colour for any
point feature in a Feature Type. This is overridden when any attributes are
displayed for the features in this Feature Type. Double-click
to change the colour.
- Symbols (Type) - defines a symbol type for
any point features in a Feature Type. Only used when no attributes are displayed
for the Feature Type. Double-click to
change the symbol.
- Symbols (Size) - defines the size of a symbol
in map units. Only used when no attributes are displayed for the Feature Type.
- Lines (Colour) - defines a colour for any
line features in a Feature Type. This is overridden when any attributes are
displayed for the features in this Feature Type. Double-click
to change the colour.
- Lines (Type) - defines a line type for any
line features in a Feature Type. This is overridden when any attributes are
displayed for the features in this Feature Type. Double-click
to change the line type.
- Line (Thickness) - defines the thickness of
a line in map units. Only used when no attributes are displayed for the Feature
Type.
- Polygons (Colour) - defines a colour for any
polygon features in a Feature Type. This is overridden when any attributes
are displayed for the features in this Feature Type. Double-click
to change the colour.
- Polygons (Type) - defines a fill type for
any polygon features in a Feature Type. This is overridden when any attributes
are displayed for the features in this Feature Type. Double-click
to change the fill type.
- On Icon - an icon which is displayed in the
Layer Manager when a Feature Type is retrieved
from the database and is 'switched on'. The nominal size for a Feature Type
icon is 45x45 pixels and the icons look best with a black border one pixel
in width. Double click the icon box to select a Windows Bitmap or JPEG file.
- Off Icon - an icon which is displayed in the
Layer Manager when a Feature Type is retrieved
from the database and is 'switched off'. Typically this is a grey level version
of the OnIcon. Double click the icon box to select a Windows Bitmap or JPEG
file.
Attributes
Click on the Attribute tab to setup and edit
the attribute definitions.
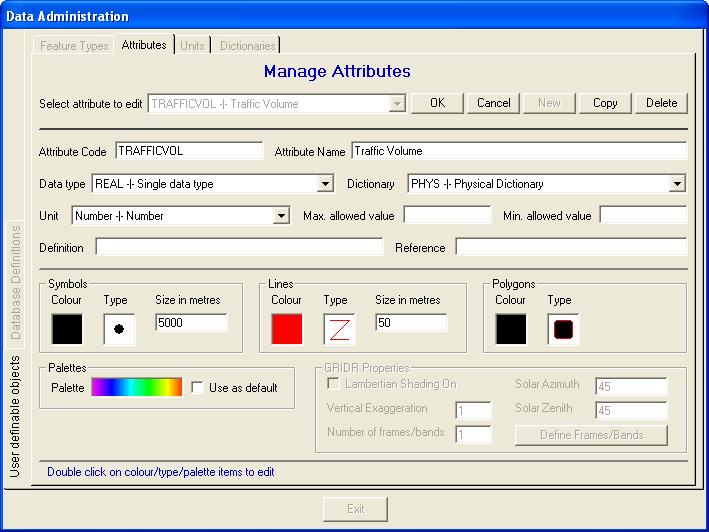
To edit an existing attribute select an attribute from the drop-down
list or to add a new attribute click on the New
button. You can then enter or modify any of the items which are used to define
an attribute. If a new attribute is being added then an Attribute
Code and an Attribute Name must be entered.
All other items (except those designated as optional) will take default values
unless you enter or change the values. The items that may be entered or modified
are:
- Attribute Code -
a unique character text string used to identify the Attribute both internally
within the database and within any input files that are being loaded into
the database.
- Attribute Name - a textual description of
the Attribute which is displayed in the Query
Wizard in the STEMgis Viewer -
can be up to 255 characters but is best kept below 50 for visualization in
the Query Wizard.
- Data Type of Attribute - used to define data
type. Options.
- Dictionary - select a dictionary
to which the Attribute belongs.
- Unit - select a unit
for the Attribute.
- Definition - a longer text description of
the Attribute (optional)
- Reference - used to define a reference to
the Attribute (optional)
- Symbols (Colour) - defines a colour for the
Attribute displayed with point features. Double-click
to change the colour.
- Symbols (Type) - defines a symbol type. Double-click
to change the symbol.
- Symbols (Size) - defines the size of a symbol
in map units.
- Lines (Colour) - defines a colour for the
Attribute displayed with line features. Double-click
to change the colour.
- Lines (Type) - defines a line type. Double-click
to change the line type.
- Line (Thickness) - defines the thickness of
a line in map units.
- Polygons (Colour) - defines a colour for the
Attribute displayed with polygon features. Double-click
to change the colour.
- Polygons (Type) - defines a fill type for
any polygon features Double-click to
change the fill type.
- Palette - Attribute values may be displayed
as proportional symbols/lines or as coloured symbols/lines/polygons. If you
wish to specify the latter as default then check the Use
as default check box. Double-click
the palette box to change the default palette for the Attribute.
- Lambertian Shading - for 'Real' grids this checkbox will turn Lambertian shading on or off.
- Solar Azimuth and Zenith - these values specify the default values for applying a simulated illumination to a 'Real' grid.
- Vertical Exaggeration - defines the default vertical exaggeration applied during the shading process.
- Number of frames/bands - specifies the number of frames/bands in a grid attribute definition. Frames/bands can be thought of as attributes within a grid attribute, e.g. the bands might represent different spectral wavelength in a remotely sensed image or different parameters from a model output. If a grid attribute has more than one frame/band then each must be related to existing attribute definitions stored in the database (see below).
A special case exists for attribute names. To plot a pair of attributes as
proportional arrows as opposed to proportional symbols the pair of attribute
names must end in speed (or Speed) and direction (or Direction), e.g. 'Current
Speed' and 'Current Direction'. When these data are retrieved from the database
the Query Wizard interprets the names and plots the data as proportional arrows.
The statistics are also calculated assuming polar co-ordinates.
Many attribute definitions can be added at once by loading an attribute
definition CSV file.
Defining Frame/Band Attributes in a Multiband Grid Attribute Definition
If a grid attribute definition has more than one frame/band then each frame/band must match up to an existing attribute definition in the database. This allows STEMgis Viewer to know information about default palettes, names, units etc. The form below is activated by clicking on the Define Frames/Bands button on the Manage Attributes form.
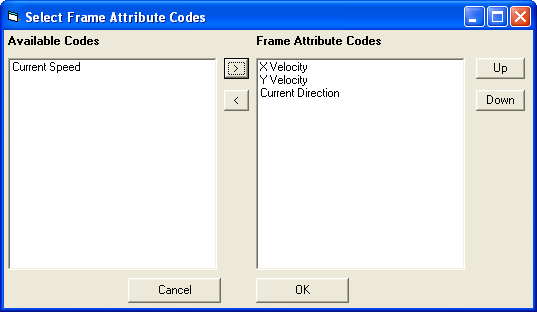
The list on the left provides the existing attribute definitions stored in the database. Left-click on an attribute name to select it and then click on the > button to transfer it to the list of frame attribute codes, i.e. those attribute representing each frame/band in the grid attribute definition. In the illustration above we have three frames/bands belonging to the grid attribute definition. To remove one you can left-click on the attribute name and then left-click on the < button. To change the order of the attribute names, left-click on the names and then click on the Up or Down button to alter it's position within the list.
Units
Click on the Unit tab to setup and edit the
unit definitions.
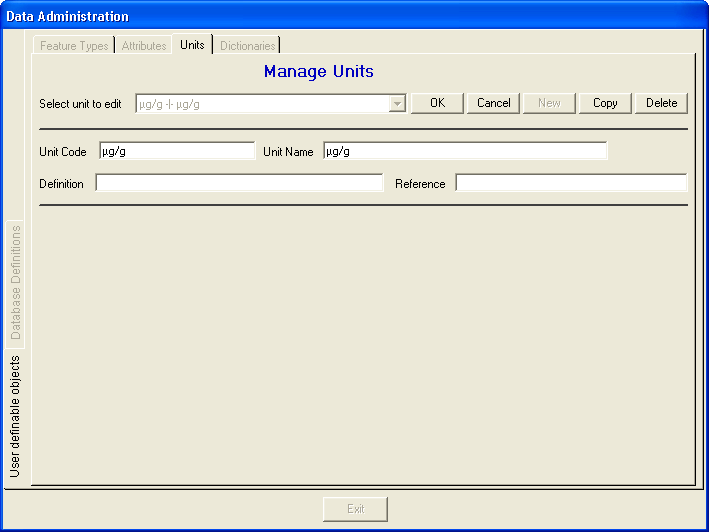
To edit an existing unit select a unit from the drop-down list or to add a
new unit click on the New button. You can then
enter or modify any of the items which are used to define a unit. If a new unit
is being added then a Unit Code and a Unit
Name must be entered. All other items (except those designated as optional)
will take default values unless you enter or change the values. The items that
may be entered or modified are:
- Unit Code -
a unique character text string used to identify the Unit internally within
the database. Some units are provided
with the database.
- Unit Name - a full textual description of
the Unit.
- Definition - a longer text description of
the Unit (optional).
- Reference - used to define a reference to
the Unit (optional).
Dictionaries
Click on the Dictionary tab to setup and edit
the dictionary definitions.
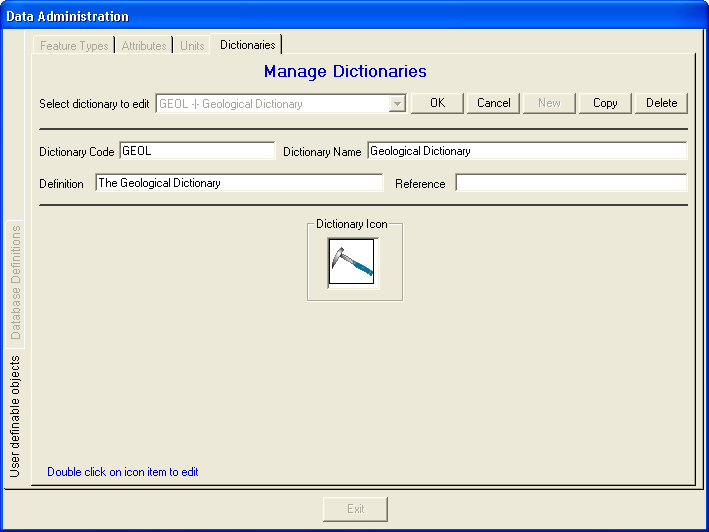
To edit an existing dictionary select a dictionary from the drop-down list
or to add a new dictionary click on the New button.
You can then enter or modify any of the items which are used to define a dictionary.
If a new dictionary is being added then a Dictionary
Code and a Dictionary Name must be entered.
All other items (except those designated as optional) will take default values
unless you enter or change the values. The items that may be entered or modified
are:
- Dictionary Code -
a unique four character text string used to identify the Dictionary internally
within the database.
- Dictionary Name - a textual description of
the Dictionary which is displayed in the Query
Wizard in the STEMgis Viewer
- can be up to 255 characters but is best kept below 50 for visualization
in the Query Wizard.
- Definition - a longer text description of
the Dictionary (optional)
- Reference - used to define a reference to
the Dictionary (optional)
- Dictionary Icon - an icon which is displayed
in the Query Wizard when attributes are
being selected within a query. The nominal size for a Feature Type icon is
45x45 pixels and the icons look best with a black border one pixel in width.
Double click the icon box to select a Windows Bitmap or JPEG file.
Projections
Click on the vertical Database Definitions vertical
tab and the Projection Limits horizontal tab
to display the form that allows the projection definitions to be edited.
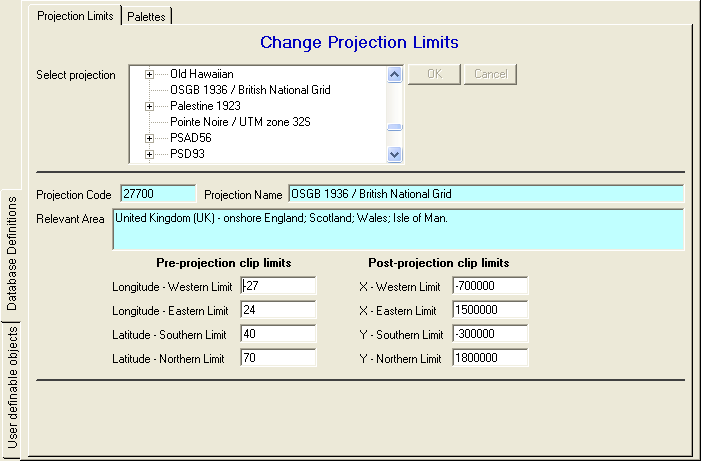
Select a projection from the hierarchical list and enter any required
pre- and/or post-projection clip values in the white text boxes. The light blue
text boxes cannot be edited and text within them is provided for information
only.
Due to the algorithms used in many
projections a wrap around effect can occur when applied to global map coverage.
The effect is manifested as parts of the world outside the relevant area of
the projection doubling across or wrapping around those parts that are valid
within the projection. It is possible to overcome this effect by clipping the
co-ordinate data prior to the projection and then clipping the projected co-ordinates
post-projection. The pre- and post-clipping parameters are defined and adjusted
as shown above. The post-clipping parameters also provide the ability to set
up study areas.
Palettes
Click on the vertical Database Definitions vertical
tab and the Palettes horizontal tab to display
the form that allows the user to define and/or edit colour palettes.
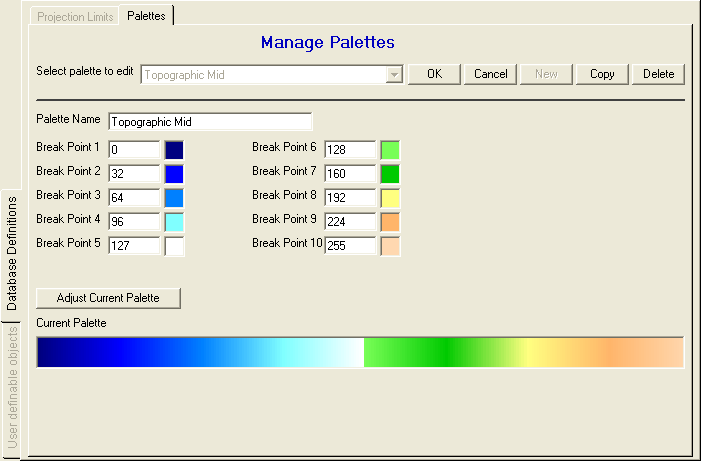
To edit an existing palette select a palette from the drop-down
list or to add a new palette click on the New
button. You can then enter or modify a series of colour 'break points' which
are used to define a palette. If a new palette is being added then a Palette
Name must be entered.
Up to 10 break points can be defined in each palette. These break
points may be positioned anywhere within the 0 to 255 range of colours. Colours
are interpolated between each break point to give a continuous shading pattern.
The interpolation is linear in the red, green and blue components of the colour.
To define a break point, type in the required position between 0 and 255 and
then left-click on the neighbouring colour box. This invokes the standard Windows
colour picker. Select your desired colour and click OK. To view the modified
palette at any time click on the Adjust Current Palette
button.