Draw Vector Tool
The Draw Vector Tool provides a means of manually adding a vector-based layer to the Map Window from within the STEMgis Viewer, i.e. the STEMgis Manager is not involved. This vector layer can be deleted (using Layers>Delete Current Layer) when it is no longer required, or it can be saved as a comma separated file. The saved comma separated file does not form part of a STEMgis database but may be retrieved using the Add Layer from File option in the Add Layer dialog box. Since the CSV file is saved in the correct format for the STEMgis database it can also be added using the STEMgis Manager.
To add or retrieve a vector layer click on the Draw
Vector tool icon ![]() in
the Tool Bar. By clicking on the arrow to the
right of the icon the user may chose between editing a file or creating a new
layer.
in
the Tool Bar. By clicking on the arrow to the
right of the icon the user may chose between editing a file or creating a new
layer.
To draw a new vector layer click Add New Layer. The Edit Controls dialog box will appear to the right of the Map Window in the Legend Window. Choose the Vector Type to be added by clicking one of the Points, Lines, Polygons or Trapezia radio buttons. The Snap Distance is the distance within which the program will attempt to snap to an existing point or line, or close a polygon or trapezium. The Snap Distance can be altered by entering a new numerical value and pressing OK. As a rule of thumb make the snap distance smaller as the Map Window scale increases, and make the snap distance larger as the scale decreases.
Drawing Vectors in a New Layer
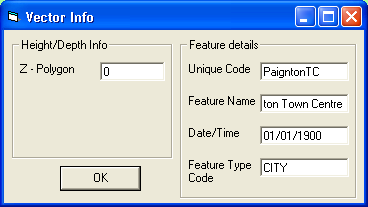
When drawing features in the new vector layer click the Enter Feature Info check box if you wish to enter a height/depth value to define the point or other feature information required when loading feature into a STEMgis Database, e.g. name, unique code, time and feature type. To start adding a vector move the mouse pointer into the Map Window. The cursor will be a circle, the diameter of which reflects the Snap Distance set in the Edit Controls box; the larger the snap distance the larger the circle cursor. Move the cursor to the location that you wish to enter the first vertex and click the left mouse button. When drawing points its position will be shown with a symbol. When drawing lines and polygons, every time you left click within the Map Window a new vertex will be added to the feature. To finish drawing a particular feature click the right mouse button within the Map Window. Right clicking does not add another vertex to the feature so you must have defined all the vertices before performing this action. When drawing polygons, right clicking will close the polygon by adding a vertex to the feature at the same location as the first vertex. Trapezia features are a special type of vector used primarily for correcting height values between variable datums. They must have four vertices and will be closed as soon the fourth vertex is drawn.
Once a feature has been completed, if the Enter Feature Info box was checked, the Vector Info dialog will appear awaiting entry of the additional information. This information will be essential if you wish to load the new data into a STEMgis database. Trapezia features will require four Z values which represent the variable offset between two datums at the four corners of the trapezia. During the correction procedures a linear interpolation is used between the four vertices to calculate the variable offset within the trapezia.
To add more features simply repeat the steps above.
If the user tries to add a vertex within the snap distance of an existing vertex then the new vertex will automatically be snapped to the existing one. If this is not desired the user should reduce the Snap Distance by entering a lower value and clicking OK. The change will be reflected in the size of the circle cursor. Alternatively the user can Zoom in and use a larger scale map to acquire greater geographical discrimination. Snapping to existing features is extremely useful when drawing polygons and trapezia that need to share boundaries or lines that need to be adjoined.
Deleting Vertices and Features
To delete an element of an incomplete vector of any of the vector types press D on the keyboard and the last drawn element of the line, polygon or trapezium will be erased. Pressing D again will erase the next previously drawn element and so on. This procedure can be repeated until all elements of the incomplete vector are erased. This does not apply to Points which by definition have a single vertex and thus are always complete.
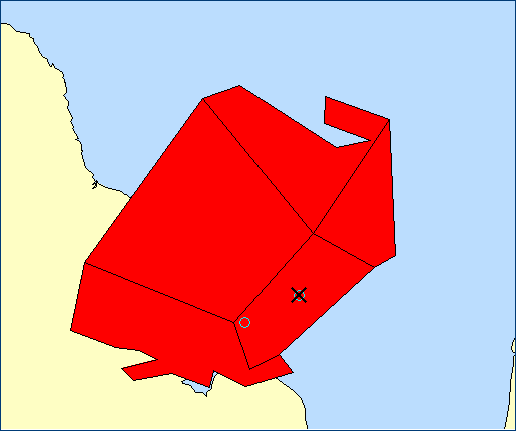
To delete a completed vector of any of the vector types press D on the keyboard and position the resulting cross/circle cursor within the snap distance of the element to be deleted and click the left mouse button. In practical terms this means the Point or Line to be deleted must be within the circle (snap distance) part of the cursor, and for Polygons and Trapezia the cursor should be positioned inside the polygon or trapezium to be deleted. In the image below the bottom of the two trapezia is about to be deleted.
Moving vertices
Once a feature has been completed, the user can move any of its vertices if
modifications are required. To do this press the M
key within the Map Window. The cursor will be
changed to a grab hand ![]() .
Left click on the vertex that you wish to move. This vertex will be highlighted
with a circle symbol and the cursor will change to a pointer finger
.
Left click on the vertex that you wish to move. This vertex will be highlighted
with a circle symbol and the cursor will change to a pointer finger ![]() .
Left click the new position of the vertex and the feature will be redrawn with
the modified vertex. The figure below shows the stage of the procedure after
the vertex has been grabbed.
.
Left click the new position of the vertex and the feature will be redrawn with
the modified vertex. The figure below shows the stage of the procedure after
the vertex has been grabbed.
Finishing Drawing
To finish adding features to the new layer click on the Draw Vector tool icon on the Tool Bar. The data entered into the new layer can be saved as a comma separated file for later retrieval or for incorporation into the STEMgis database using the STEMgis Manager. If the new layer is not saved it will be lost either when the layer is deleted using Layers>Delete Current Layer or the STEMgis Viewer program is closed.
Saving a Layer to a File
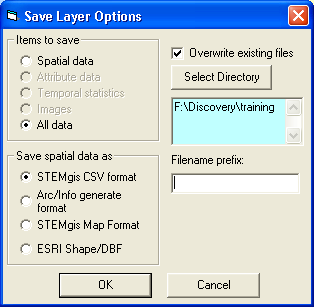
To save the data entered into a new layer with the Vector Draw tool either click on the Save/Export Layer icon on the Tool Bar or from the File menu select Export Layer. The Save Layer Options box allows spatial data to be saved in either STEMgis CSV format or Arc/Info Generate format. A filename prefix should be entered but not the file extension, i.e. do not add .csv or .gen. The appropriate extension will be added automatically for the chosen format. The Items to save options available to the user will depend on the contents of the layer.
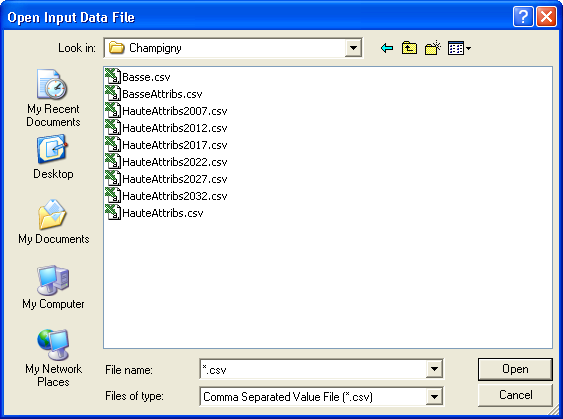
To add a vector layer previously saved as a comma separated file click Add Layer from File. In Open Input Data File choose the required sub-directory and .csv file, and click the Open button.
The vector data in the retrieved .csv file will be displayed in the Map Window. To add new features follow the descriptions above in Add New Layer.
| Browser Based Help. Published by chm2web software. |