Getting the most from the STEMgis Viewer
Introduction
The STEMgis Viewer is a generic tool for searching, retrieving and displaying spatial and temporal datasets. It has been designed to enable the exploration of multi-disciplinary datasets which traditionally have been stored in separate database systems. For example, in the environmental sector STEMgis has been used to investigate the interactions between the atmospheric, terrestrial, estuarine, marine and coastal zones.
The STEMgis Viewer’s primary searching and retrieval tool is the Query Wizard. Before describing this wizard it is important to understand some of the concepts that underpin the STEMgis Viewer software.
Important concepts
The STEMgis Viewer software provides an array of tools for querying, retrieving and displaying a diverse range of datasets. The data model that lies behind the STEMgis Viewer enables the storage of any object, or feature as it changes through space and time. Descriptions of features and the events observed at them are recorded in terms of variables, parameters or determinands, known collectively in the STEMgis Viewer as attributes. As an example, the system may hold river water quality data that has been recorded at a River Monitoring point. This point is classified as a River Monitoring feature type. The variables or attributes that are recorded at that site might include its geographical position, the site name, river flow values and so on. Other examples of features types include 'roads', 'crime locations', 'aerial photographs'.
The Query Wizard
The Query Wizard provides a simple 4-step query interface to the disparate datasets stored within a STEMgis Database. All queries that are formulated by the Query Wizard require the user to select the features of interest. This assumes that the user has enough knowledge about the features and the types of data that might be recorded at them in order to query the database. By exploring the types of features in the database you will become familiar with them and the attributes that are recorded for those features.
Once the feature types of interest have been selected the Data Dictionaries are presented to the user and the definitions of the attributes that are recorded at the selected feature types are displayed. The attributes name, unit, period of measurement and source dictionary is displayed in the Query Wizard. Up to five feature types and five attributes can be included within a query which is capable of retrieving up to 750 time slices and 100 depth intervals into each layer, i.e. up to 375,000 traditional GIS layers can be loaded into one STEMgis layer.
Query Wizard Performance Guidelines
The STEMgis Viewer has been designed to operate on a PC with a Pentium 133 or greater. A higher specification PC and installation of the database on the hard drive (as against leaving a distributed database on the CD) can dramatically improve retrieval performance. However, in many instances the database will be built on the PC’s hard drive. A Windows swap space of at least 100Mb is recommended.
Complicated queries that span large spatial and temporal datasets are very easy to formulate. However, during the learning phase it is sensible for the user to ensure the query is focused on a geographical area of interest by using the ‘select area’ tool to reduce the default ‘select area’ before experimenting with the STEMgis Viewer. In this way maximum use will be made of learning time.
The Query Wizard allows many features and attributes to be included within a query. As you add more features and attributes, restrict the date and time range, and choose to calculate statistics, the complexity and time required to search and retrieve the results of a query will increase. Start by building simple queries. This will give you an idea about the general performance of the STEMgis Viewer and likely duration of your queries. Start by selecting only one or two features and attributes and restricting the geographical area of the query. Make use of the ‘retrieve sites only’ option in the Query Wizard to gain a feel for the extent and coverage of the datasets.
Command Line Options
STEMgis installation procedures leave the command line options blank and starting STEMgis Viewer without any command line options will assume that the blank default database is used. This allows the user to open a STEMgis database of their choice by using the File>Open STEMgis Database option from the Menu Bar. However, the command line options can be used to create useful shortcuts that allow the user to start the STEMgis Viewer with a pre-determined choice of database, a default map file and an optional combination of STEMgis workspace file and view. The command line options are:
-dsn 'Database Source Name'
-map 'Map File Name'
-wk 'Workspace File Name'
-view 'View Name'
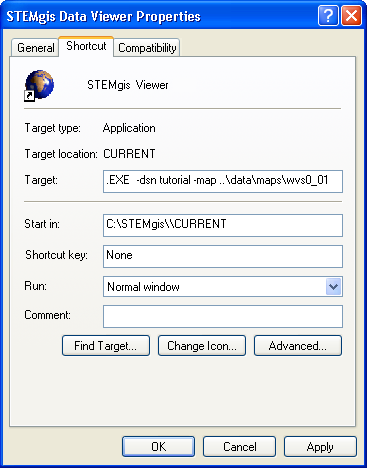
Creating a Shortcut
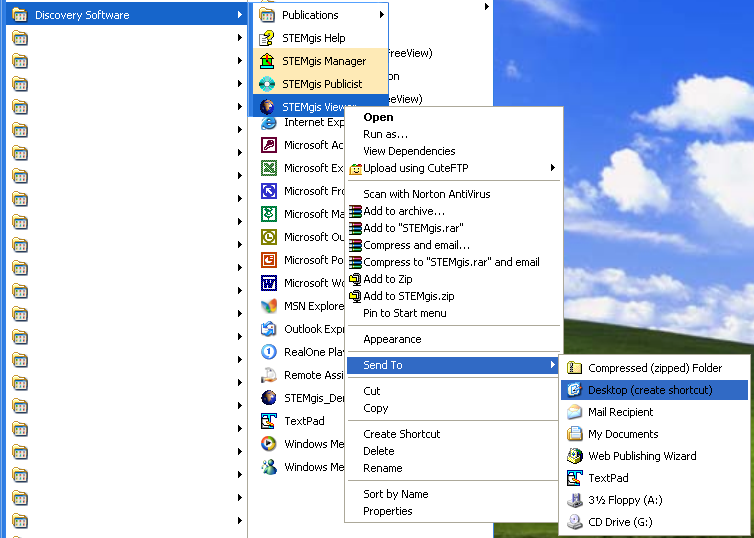
To create a shortcut select the 'STEMgis Map Viewer' from the Programs>Discovery Software menu. Right-click on the STEMgis Viewer item and select Send To->Desktop (create shortcut).
This will create a shortcut on the desktop called 'STEMgis Map Viewer'. Right-click on the new shortcut and select Properties.
In the properties windows enter/edit the command line options in the 'Target' field. Double-clicking on the new shortcut will then open the STEMgis Map Viewer with the desired database, background map and/or workspace file.
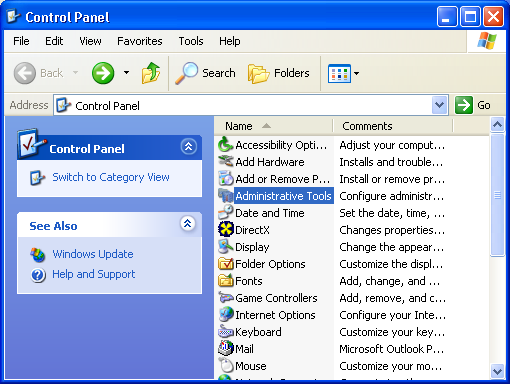
Create a DSN Setting
If you do not have one, you will also need to define an ODBC DSN setting for the new STEMgis database. To do this open up the Windows Control Panel. Under Windows 2000 and XP you will need to go into the Administrative Tools section of the Control Panel (this may be under the Performance and Maintenance section under Windows XP, depending how you are viewing the Control Panel).
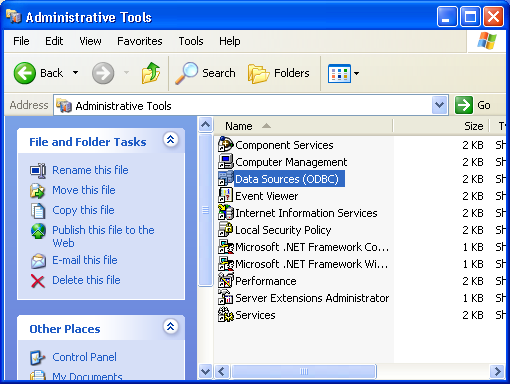
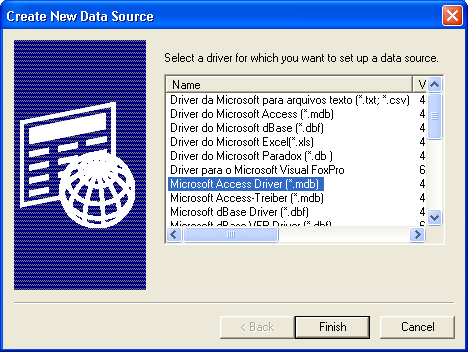
Then double click on Data Sources (ODBC) to setup the DSN setting. Select the System DSN tab and click on the Add button.
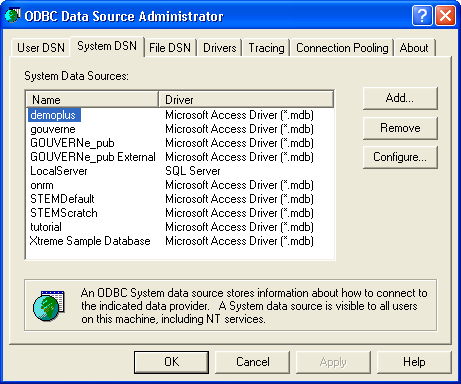
Select the Microsoft Access Driver and click on the Finish button.
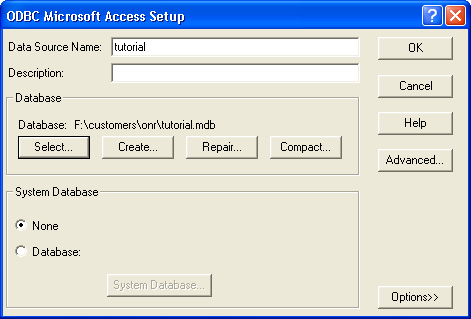
Type in the Data Source Name and then click on the Select button to select the database that you wish to use. Click OK when you have finished.
Double-clicking on the new shortcut you created earlier will then open the STEMgis Viewer with the desired database, map, workspace file and/or view.
Using the View Option
The 'view' command line option can be used to start up STEMgis Viewer or FreeView from an external program or script. The 'view' option will load up the chosen view as defined in the Workspace file. If the Viewer or FreeView is already running then executing the command line will communicate to the existing occurrence of the viewing that it should change it's view to that selected in the command line. Note that a second window showing another occurrence of the Viewer or FreeView will not appear and that execution will terminate. The existing version will show the new view.
| Browser Based Help. Published by chm2web software. |